11 Steps to master 3D Resin printing by Stefan Adolfs
Dear 3D-printing enthusiasts,
Please let me introduce myself. My name is Stefan Adolfs, owner of a small 3D printing company called ‘Solid 3D printing’. I specialize in special resin prints; wax, tough and flex resins. I have customers in the art and engineering business. It took me a while to find the right settings and all the dos and dont’s with resin prints. I would like to save you the trouble of endless evenings and nights trying to get your print up to the desired quality.
To make this quick to read, I will keep this post in a summary form. First, you will need a resin 3D printer
Quick tips for your first purchase
1. Not too expensive; you’re just starting, don’t buy an expensive machine that you can ‘damage’. Often expensive machine have their own resins and resin dispense methods, those are expensive too.
2. In my opinion, a 4k LCD screen is the bare minimum; the prices difference is small nowadays, and it will increase the level of detail on your prints.
3. Do your research before buying; just like buying a car, you have a preferred brand but at the end it is about the driving.
Shopping list for your first 3D print
Resin printing can be a ‘messy business’. That’s why you require some accessories next to the printer:
1. Good quality resin
Resin is available in a lot of different qualities. I prefer FormFutura resin because they have a high consistency rate and all their data is available on their website. So no surprises there!
2. IPA (Isopropanol Alcohol 99.9%)
NOT for drinking of course, this is used for cleaning the print. The print has residue on it. That needs to go! There are more “cheaper” and “environmental friendly” alternatives. But to be honest, IPA is the way to go.
3. Set up tools
Most of the necessary tools will be delivered with the printer. More info will be found in a later section.
4. Filters
Needed to pour the resin back in to the bottle. To filter out the debris.
5. Safety precautions
Buy nitrile glove, safety goggles and a face mask. Resin has toxic fume and irritates the skin. So don’t touch it, smell it or drink it!

Let’s start!
Step 1: Checking your printer settings on the printer
1. Check your UV power settings. Most printers are on 100% or 80% UV power. Not every resin works well with these settings. This needs to be tested before printing. I will get to how to test this in step 3.
2. Check the LCD screen for ‘dead pixels’. On the machines, you can check the exposure settings. Put it on 10 seconds and make sure you can see the screen, but DO NOT STARE DIRECTLY into the light. Try to check the screen in an angle. You shouldn’t see black dots. If this is the case, call up the store where you bought the printer.
Step 2: Calibrate your Z-axis
This is a hard to describe in general. Every printer has its own way to do this. Make sure to check your manual!
Step 3: Heat your resin bottle and pour
1. Resin works best at room temperature +/- 20 degrees Celsius. If your resin is stored cool, then heat the bottle au bain-marie (bottle in hot water) until it reaches a temperature of more or less 20 degrees Celsius.
2. Shake the bottle firmly about +/- 2 minutes.
3. Pour the resin in the basin and make sure you have more resin in the basin then needed for the print, otherwise you will create a vacuum in the basin. Wait 10 minutes after pouring to let the air bubbles out of the resin.
4. Don’t overfill the basin. Most printers come with a max mark in the basin, this is there with a good reason.
Step 4: Use a slicer that you like
Read up on which slicer you prefer. Here are some common ones: Chitubox, Lycée, developers slicers (Photon, Formlabs, Creality etc.). For more additional information about how to use these slicers and the ‘pro section’ about the usage, check THIS channel.
Step 5: Test, test and uhmm test
1. We are all hyped up to go straight away to the printing of your favorite model.
2. Run a RERF file first with every new resin! Even with different colors of the same brand.
Click HERE to see an example of a commonly used RERF file.
There are a lot of videos explaining how to compare the RERF print, like THIS video.
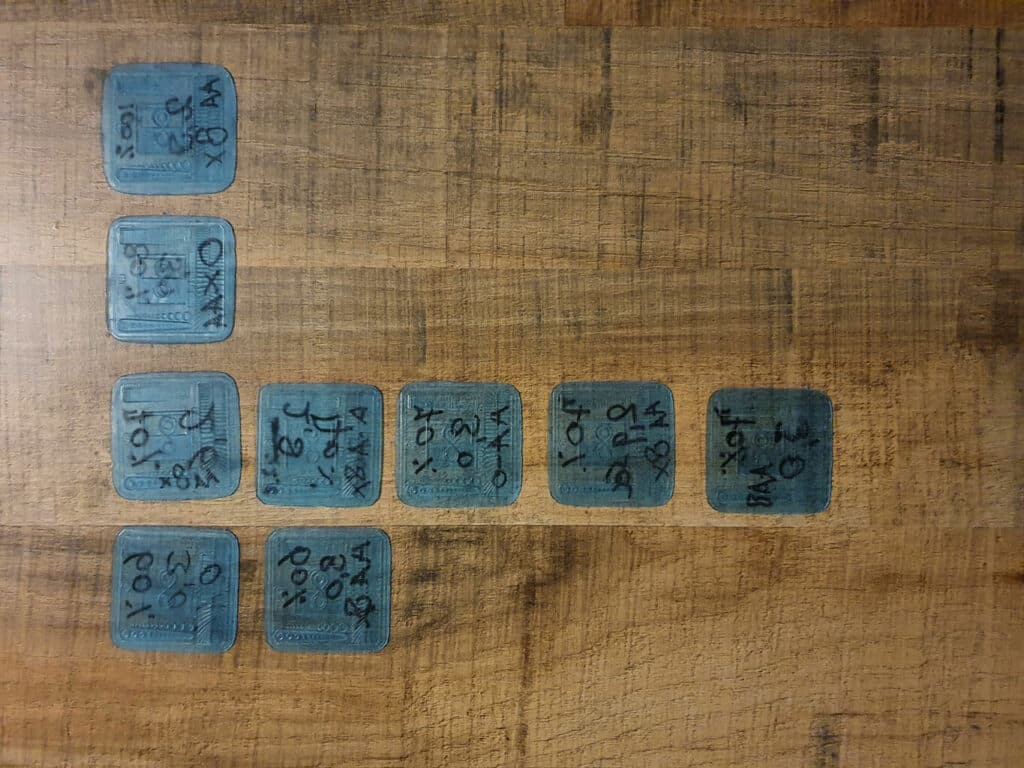
RERF prints to test bed leveling and adhesion to the build plate.
Printing your model
Step 6: Print your model
1. Use your settings from the RERF model.
2. Make sure that your model orientation is correct.
3. Check for islands (If you don’t know what islands are, watch THIS video)
4. Try to minimize support cones
5. Wait until the printer is done.
Step 7: Scrape your print off the print bed
If you are using a steel scraper to get the model off the build plate, make sure that you use the angled edge on the right side. So facing upwards. You don’t want to hold the scraper at an angle. Lay it flat on the bed and gently push the scraper beneath the print. Don’t try to push firmly, you want to break the vacuum between the build plate and the print. You don’t want to scratch the build plate or your hand.
Step 8: Rinse with alcohol
Put your model in a Tupperware case or a something you can seal shut. Pour the alcohol on your model. Close the lit and shake. Or use a washing alternative.
Step 9: Clip the supports off
I normally preheat the supports before clipping them off, then I wash the print in lukewarm water +/- 50 degrees Celsius for 2 min. This makes the supports more flexible and easier to clip without damaging the print.
Step 10: Post process the print
There are multiple ways to post process a print. I will break them down in multiple sections.
1. Sanding with sandpaper
Sanding is an easy way to get supports contact points away. Start with a K320 grind and go up to the preferred grind.
2. Sanding with machines
Sanding with machines is “faster” but more dangerous for your print. It sands too quick but is useful for large non-detailed areas.
3. Tumbling
This is a method normally used for polishing gemstones. This can be used for 3D prints as well. But it can be messy on the print and small details can break off. For a resin print, use a really fine additive.
4. Hot sculpting
This is usable with wax resin. You can heat the surface of your print with a soldering tool and heat the print and deform the surface with heat. This is nice to fill small holes.
5. Curing to fill gaps
If you have small damaged areas, you can fill them with uncured resin, then cure that specific place and sand it down afterwards.
Step 11: Curing the print
Cure the print in a cure chamber or sunlight. The curing time differs per brand. Make sure you read the guidelines on the resin bottles or website from the supplier.
Step 12: Done!
This is the step where you can enjoy your work and be proud of what you created.
Outro
I hope that these steps helped you to up your game in resin 3D printing. Keep in mind that resin printing is way harder and time-consuming than the FDM print method. But, the result are worth it. In my case, every model that is printed well, puts a smile on my face that won’t come off for at least 12 hours until the next print is done 😊. I hope it will bring the same to you out there. As last feature, It would like to close this blog with five tips & tricks.
Tips and tricks
1. Test RERF > Printing straight away. This saves you time and money. I can’t repeat this enough!
2. Take the time to check your model in the slicer. 90 percent of the mistakes are made in the slicers.
3. Resins have a very wide range of quality and uses. Read reviews first before you buy bottles.
4. Room temperature is important, especially with “special” resins. The viscosity of the resin changes at lower temperatures.
5. If you don’t have fun, STOP printing. I run my company for the love and fun of 3D printing.
My main income is based on teaching youngsters everything about mechanical engineering. Thank you for the patience of reading my post! If you have any remarks or further questions about the post or 3D printing, mail me at stefan@solid3dprinting.com. If the questions are resin related, make sure you contact FormFutura.
Sincerely,
Stefan Adolfs